Access & Setup
The Microsoft Azure Active Directory integration requires some technical expertise for initial setup, so it is recommended to be handled by a system administrator or IT personnel. The step-by-step instructions can be found below:
Step 1: Go to “Azure Active Directory” in your Azure dashboard. Click “Enterprise Applications” from the sidebar → “New application” → “Create your own application." Input the name you would like to call the integration and select “Integrate any other application you don’t find in the gallery (Non-gallery) option below the input field.
Step 2: Click “Create” → “Provisioning” → “Get started.” Select “Automatic” as the Provisioning Mode.
Enter
https://app.sendtransmission.com/scim
as the Tenant URL
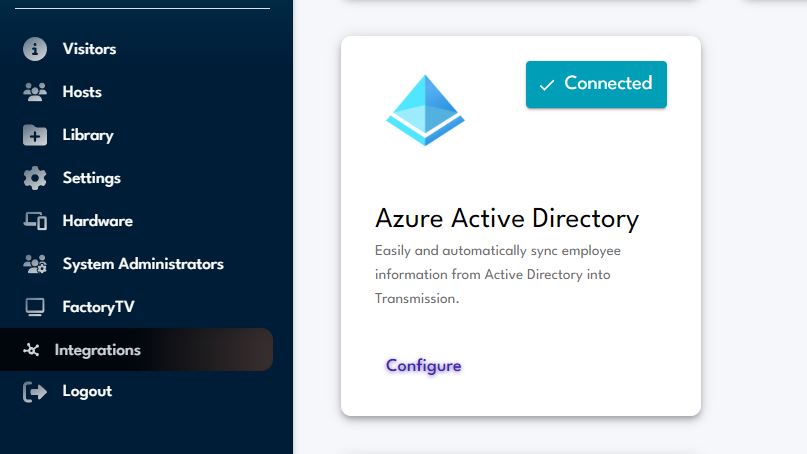
Step 3: Go to the Integrations page in the Transmission dashboard and click “Configure” on the Azure Active Directory card. Copy the secret from the dialog and paste it into the “Secret Token” field of the Provisioning settings. Test connection and save.
Step 4: Disable mapping for groups by clicking “Mappings” to expand that section, clicking “Provision Azure Active Directory Groups,” and toggling “Enabled” from “Yes” to “No.” You will map fields from Azure Active Directory to Transmission by clicking “Provision Azure Active Directory Users” and editing the Attribute Mappings as needed. Target/customappsso Attribute must be as pictured in the screenshot below however, you can configure source attributes however you like
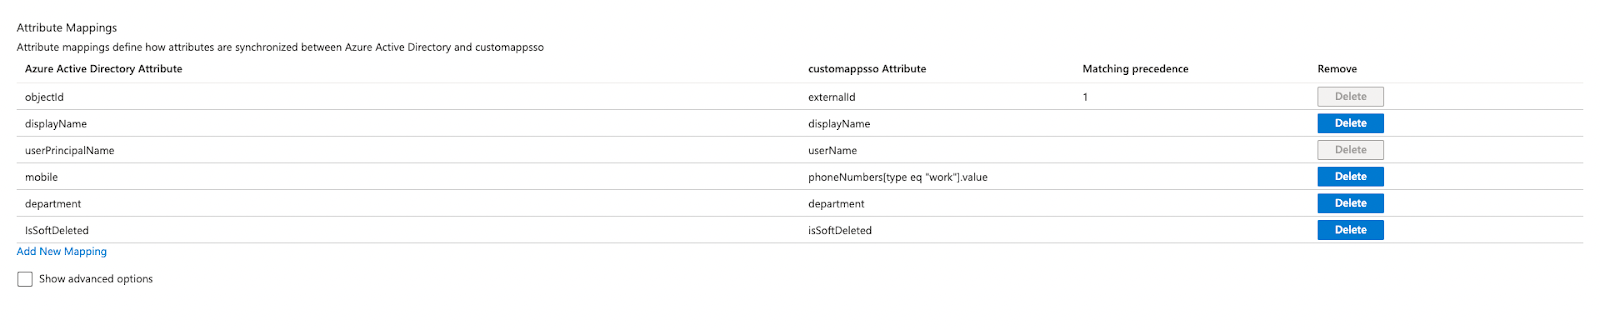
Two target attributes will need to be added to complete the mapping so you will need to click “Show Advanced Options” and then “Edit attribute list for customappsso”
At the bottom of the list you can simply add department and isSoftDeleted and click “Save

Step 5: Next you should assign any Groups and/or Users to the application which you would like to sync with employees inside of Transmission. To do this, simply go to the Enterprise Application, click “Users and groups” and add the desired users and groups (Active Directory Premium P1 or P2 required to assign groups). We recommend creating custom groups of users based on your organization’s locations and then assigning each of those to their own Enterprise App. Whenever a new employee is added to Azure Active Directory simply ensure that they are assigned to the appropriate group to ensure they are provisioned in Transmission as well.
Step 6: Once all of this has been completed, you can go back to the new Enterprise Application’s “Provisioning” section and click “Start provisioning”. An initial provisioning cycle will begin within a few minutes and from there provisioning cycles will run every 40 minutes to propagate any user changes from Azure Active Directory to Transmission.
Desyncing and Resyncing
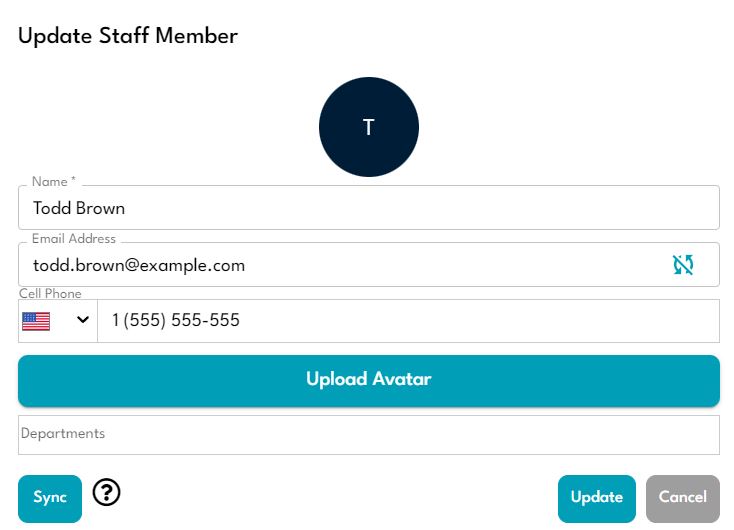
This integration allows you to edit the data of employees provisioned by Azure Active Directory. However, when you edit this data, it causes a "desync" which means that the modified fields will no longer sync. Desyncs can be useful if you want the data stored in Transmission and the data stored in Azure Active Directory to diverge in the case of certain employees.
For example, if you change John Smith's email and phone number in Transmission, an icon would appear indicating that one or more fields are no longer sourced from Active Directory. Changes to John's assigned departments and his name will continue to propagate from Azure Active Directory into Transmission but changes to his email and phone number will not.
To reverse a desync, simply click the "Edit" icon on any employee who has a desync, and click the "Sync" button at the bottom left of the dialog. This will return the employee's data to what is currently stored in Azure Active directory, remove all desync icons, and enable changes to those fields in future provisioning cycles.